We're in the new house and we're underway! Sorry for the lack of production updates of late but life got in the way for a moment or two, but myself and my lovely lady, Amy; are finally in our new house and my little setup here is well underway.
This weekend is a bank holiday here in the UK and as always that means it's time for some serious work to get done! And that means puppets! I've taken the plunge, I've made the leap, Clara is finally underway!
Come on, I'll show you. Maybe I'll learn something :)
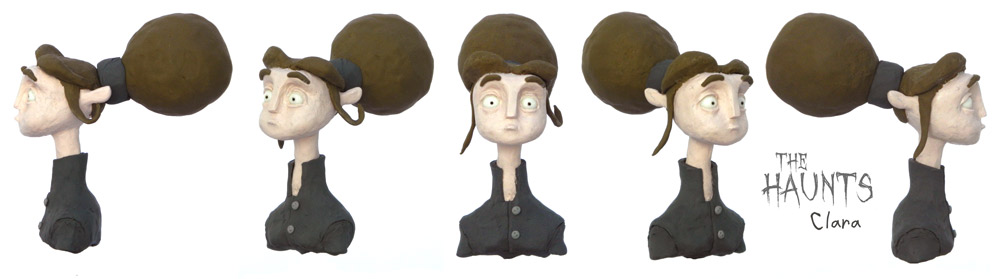
So I took another pushed casting of my last Clara mould and took to fixing it up, polishing and adjusting here and there, as this will become my actual puppet, I took my time and took the work a little more seriously. For ease of moulding I removed the ears and extraneous details such as eyelids (which will be added as separate pieces, making them easily animatable).
The lower face has been removed, and will be moulded as a separate piece, allowing for replacement animation to take place. For those of you who are unaware, replacement mouths are used extensively in stop motion animation, to facilitate a characters lip-sync, or talking, with a minimum of fuss. Essentially, the puppet's head is one large piece that remains the same for each frame, whereas the bottom area of the face is replaced in each frame with a different mouth shape.... an ooh mouth here, an aaaah mouth shape there; a smile, a frown, whatever.
I set about making a two-part mould of this head piece in much the same way that I did before. Learning from my initial go, I decided upon a more intricate seam line that would allow for easier removal of the piece and ensure no undercuts.
To both test the mould and begin production on the lower half of the face, I decided to take a casting of the mould with a much lighter plaster (as it was the only thing I had to hand) so that I could have a hard positive of the head, against which I could sculpt the lower face.
The first casting didn't go well. While the mould was nicely lubricated and removal of the plaster piece was fairly easy, the hole through which I filled the mould conjested and fooled me into thinking the mould was full when it was still half empty.
AGAIN!
The second casting suffered the same issue, and although her nose was lost in the removal process, I did end up with a usable cavity on which to sculpt the lower face.
You can see her that I have left of any mouth details, as this blank face piece will be moulded and cast again and again in plasticine, on which I will sculpt the individual mouth shapes.
Getting excited, I quickly through together a mould box around the face piece and poured in plaster, straight over the sculpt to create a one piece mould.
A word of warning, sculpey will float in plaster if you do not glue it to the bottom of your mould box. I found out the hard way :)
A couple of quick casts later and I had something approaching completion, of the moulding process anyhow.
The final pieces will be cast in newplast plasticine and theres a lot more work to be done in designing and sculpting mouth shapes, but hey, we're building puppets and we're underway!!!
Sorry for the lack of progress this week guys, but we're moving house! It's all gone a bit hectic to say the least, busy packing up maquettes and prop pieces, ready for their new home.
We'll be right back. But for now, a picture to amuse you!
Well heeeello! How are we all enjoying this fine summer huh? If you're in the UK, you're probably not. It's hellish, so it's time to hold up in the basement flat where it's nice and cool and buckle down to some work. I'm currently in the process of moving house and as such, the production here has had to take a back seat for a few days, but I'm still trying to use what little time I have to get things done.
This week I made my first ever mould. The Haunt's puppets will require push moulds to be made so that I can keep the replacement mouths consistant and so the, god forbid, I should squish Clara's face, I can just cast another :)
Some of you over on my instagram feed - @joshjobrien were asking me about the process, so I thought for this weeks blog post, I'd throw together a rough and ready process study of how to make a two part plaster mould.
Check it out! -
So first off, we need a postive model to mould. For this I'm going to use the first maquette I made of Clara. It's a good sculpt that captures her design very closely. Anyway, I sculpted her from plasticine originally and over time she's gotten bashed and beaten a little, so I cleaned her up and set to work making her a more permanent fixture.
1. So we take our finished sculpt and break her down to a moudable form.
- We take back the hair, ears and eyebrows (they could of stayed for this exercise but it was funnier to see her without them). This creates an easier form on which to create a seamline for the two part mould (so called because we will end up with two parts. A top and a bottom.)
The idea moving forward is to mould the sculpt into two haves, the top with the face detail and the bottom, or back of the head. That way we will have two halves that can be separated to release the sculpt from within.
If you're confused, hopefully all will become clear as we go along.
2. With Clara all ready to go, we do what's called 'laying up'. This process is where we lay our sculpt on a flat base (as we're about to build a box around her, and it needs a solid bottom. Hehe... Bottom)
Then we add clay material (I used plasticine) around the model, creating a water tight seam around her about half way up. What we're effectively doing is cutting her in half with clay, so that only one half is exposed.
3. Next we build up the rest of the box that will hold the plaster around our sculpt.
I've used foam board here as it's quick, cheap and easy to cut to size.
It's then pushed in against the clay and that connection between the clay and the boards then filled to make the seams watertight.
These are also hot glued together and to the base to make it solid as a rock!
4. This bit's fun! Mix up the plaster as per the packets instructions and pour into the mould.
Leave for about an hour to cure, and harden. The temperature of the environment will effect how quickly the plaster will dry as well.
5. Once cured, tear the foam board away to release the mould.
Remove the clay that we used to lay up the sculpt.
6. Now we build up our box again on the back side and re-seal all the seams.
7. Once cured on the second half, release the mould!
8. Finally, pry apart the two halves of the mould, taking care not to break it, and release the sculpt from the mould!
And no mould is complete without the first cast. Now, the reason I moulded this particular sculpt was so that I could cast it in something more substantial and hard wearing than plasticine, so I took a push casting (which entails pushing clay into both sides of the mould and squeezing the two halfs together. Rather than a traditional casting using a liquid casting material which is pour into the mould and left to set.) using polymer clay, in this case super sculpey mixed with black fimo to give it some tone. I can then bake this to create a hard, clean replica of our original soft sculpt!
You can see the results of this little test on the picture on the right, along side the original sculpt. All in all, for my first mould it was quite successful. The mould had a few air bubbles appear in awkward places and I learnt alot to take forward for the next one!
So what next?
Well I'm going to take another casting from this mould and polish and adjust it to make a new master sculpt of what will be the end puppet. I will then mould that sculpt and produce the fully working puppet head for Clara's puppet.
But of course I'll be documenting that too so stay tuned. As always, thanks for dropping by, if you have any questions or something in here is unclear, don't hesitate to get in touch; I'll help anyway I can.
Wahey! We're shaping up nicely now, and cooking with gas! This last week has seen alot of design progress. First and most importantly, I finally got around to drumming out this full body maquette of Sebastian! The cheeky little git :)
I'm hoping that like me, everybody likes the design and can see the decisions I've made along the way that have shaped his features.
There's still a few tweaks to iron out before bringing him to life in a puppet, for instance, his arms currently are slightly over long and his coat could be lengthened slightly but overall I'm very happy with where he's ended up.
Another decision that some may notice is that Sebastian no longer has his monocle. I just couldn't make it fit with the rest of his facial design as he has very little mass underneath his eye for the monocle to sit on... Just one of those 2d ideas that I couldn't convincingly translate onto the 3d model.
It's a strong idea however and I might give it another go while I'm making the actual puppet to see if I can save it :)
I'd love to hear from you all about how you like Sebastian's design as he's been a little bugger to work out. Clara happened quite naturally whilst I really had to work hard at Sebastian here....
We've got ourselves the beginning of a set design!
This week I also had just a little time to sketch out my thoughts for set design for 'The Haunts'. The film takes place in the attic space of an old, beat up victorian mansion and I wanted to find a style and atmosphere that fit well with the characters.
The room is a simple construction, which hopefully will allow me some slack as this will be the first set that I've built by myself. The large circular window hopefully adds some nice shape contrast against the angular and straight lines of the rest of the build, whilst also allowing for some strong lighting decisions and chances for silhouette.
That's all for this week. I'm finally getting a grip on the finer details of the design for the film and in the coming days I'm going to be pinning down all the finer elements of the storytelling and then we'll really be rocking and rolling.
I hope you're enjoying following along, and if you are feel free to let me know your thoughts in the comments below!
Heeeeelllooo Ladies and gents! It's been almost a week since my last post and it's been a massive auld slog!
If you're in anyway creative, you'll probably at some point go through periods where you just can't get your ideas out in a manner that you're happy with. This leads to massive frustration and head banging on tables because you come to realise the only way to battle this thing is to work through it.
The volume of output I've had this week is minimal. The volume of work is huge! I've drawn more than I ever had and all because I just could not get around my ideas with my current skill set. So what was so challenging?
For a while now I've been unhappy with Sebastian's design. It needed tweaking but I didn't know how... I knew that I liked some parts of the design and hated others. I felt he was a little bland, had not enough shape and size variation and lacked certainty and consistency. So I set about nailing down his design in a model sheet.
So what's changed?
Like I said, the guy was boring and lacked enough variation in the size relationships between his facial features to keep him interesting, however I didn't want to push things to so far that it become to broad and cartoony.
So I did two things :
1. Enlarge his eye brows.
2. Shrunk his eyes a little
3. Made a feature of his chin.
These were the decisions that were made. The brain work before the physical drawing began.
The bad, terrible, drawing...
The overly drawn, and complicated...
The overly simplistic and imprecise...
And the badly modelled and slap dashily inconsistent designs...
And that's just the face!
When it came to drawing the rest of his character, I had previously been vague and unwanting to work him out. I tried him stooped, broad chested, ploddy, light footed - nothing seemed to work and my drawings suffered a great deal from my inability to draw as well as I would like.
So I turned to Milt Kahl. As I do.
Taking a look at how such a genius drafts man tackled larger, plumper characters and from here I took inspiration for shape variation and indeed, how to draw those shapes. If you're going to steal. Take from the best.
Eventually though, well today... I managed to breakthrough and figure out the design which I had been striving for. I hope you guys like it. Now all I have to do is build him :)
More soon,
Thanks for dropping in.
Josh.
Tuesday, 4 June 2013
Hey guys, just checking in real quick to show you the traditional stuff that I've been working on in the last few days. I'm itching to animate but currently don't have a camera or puppets to wrestle with so I broke out the paper and pencils to test out some rotation with Sebastian. My drawing isn't amazing but it serves the purpose.
I'll have a longer shot for you before the week is out.
Hope you like!
Cheers for stopping by.
Right-ee-ho! Good day to you all. It's late and I'm typing fast. It's been a bank holiday weekend and I've been working hard. There's been a possibility that's arisen recently that I may be able to collaborate with a wonderfully talented costume maker on this film now...
While I was looking to do everything on this by myself, costume is the only field in which I am left completely adrift. I couldn't tell a cross stitch from a cable stitch (or other such haberdashery terms).
And so, this brought to mind the fact that I absolutely need to nail down the design of these guys. Obviously with each sculpt I do, I find new angles, new lines and the design gets shaved and poked closer and closer to a final design but basically that's what the maquette above is built to do.
The pic above shows you the original colour of the baked clay sculpt on the left and the quick digital paint over I gave her to illustrate her colour scheme, on the right. I apologise for the poor lighting which has washed out her features in the front view.
I needed a sculpt to illustrate the shapes and lines I was after for Clara's clothing, and I think I'm happy with what I've hit upon. It's a design taken from my idea of what victorian clothing would look like on her. It has no real basis in a real world time period but suites the character and places her nicely as 'other-worldly.'
There's so much work left to do before I can move on, including a full body sculpt of 'Sebastian', which currently terrifies me. He's much more complicated and it's gonna be alot of work to recapture my initial sculpt. However, I relish the challenge.
Just another quick one this time. Hopefully I'll remember to take some more progress pics while I'm working on 'Sebastian' so you have a little more to look at.
Here's to the evolution of a project! So, a little pause... I've been super busy of late in my life outside of The Haunts, and have had a stall in the funding of the project (which is my own money :)), which has slowed down the initial momentum of the project.
Unfortunately there's now no way I can make this in time for the Virgin Media Shorts deadline, which I was hoping to hit. However the film is still alive as ever!
This week I've been working on more design issues. As you can see above, I'm working on size comparison between characters and other such goodness.
And also the film now has a Facebook page!!
So come join the party over there! We'd love to see ya!
I'll have a lengthier post on model sheets and the work I've been doing up by the end of the week!
And soon my friends, very soon, there will be puppets afoot!
I can't frickin' wait! I'm trying to slow myself down a little and make sure I've done my ground work before diving in to the fun of making puppets, but they're on their way!!
Just a quick one today, written from my iPhone cos I'm working on the go! I'm a hip young artist after all, there's no standing still aloud! Having said that, it's time for a sit down :)
I just wanted to post some of my more recent pre prod art work, some of you will have already seen most of it.
Basically, Sebastian has had a costume change!
The thinking behind this is that while, the gardener type attire that I had originally envisioned was perfectly good and executed a wonderful little joke about a gardening fork for a walking stick, the character that went along with that didn't quite fit with the rest of the film. That is the major thing I'm learning about character design that may help anyone else in the same process;
the characters do not live by themselves. You're not just designing a character but an ensemble and a whole film.
So I've started playing around with different attires and attitudes and body shapes whilst maintaining the essential features of the characters face. Take a look!
This was a quick sketch of an idea that I then worked into a quick colour revision, using pen, pastels and a craft paper sketchbook! :)
I've been drawing a lot this week, trying to figure out the personalities of Sebastian and Clara on paper.
Also this week I've been experimenting with armature design in practise, building simple armatures to test out design ideas and to figure out what is essential in my puppets.
Things are chugging along nicely here at haunts HQ!
So, for this post I wanted to delve into my planning process for my puppets for the haunts. Anyone already versed in stop motion animation will know that there are a million different ways and materials to approach making a stop motion puppet. But there are three methods that seem to be most useful, and certainly used more than most.
1. Foam Latex - a cast-able and spongey material that can be painted, holds details well and and is fairly durable.
2. Plasticine - Anyone whose seen a 'Wallace and Gromit' film will be familiar with this one. Plasticine is a clay that never dries. It can be mixed into any colour and is a wonderfully versatile material. It can be heated to soften it, frozen to make it rock hard and also mixed with waxes and other materials to give it different properties, such as hardness, and stickiness.
3. Foam build up - This process involves ordinary foams which one might find in cushions and the like being stuck directly to the armature (skeleton) of the puppet and being shaped and carved into the correct shapes and forms of the character design. Typically these will be clothed with fabrics and textiles, almost like dolls clothes.
Now, one thing I mentioned in there was the 'Armature' of the puppet. For those that don't know, the armature is the underlying structure that holds the bulk of the puppet and also hold the puppet in the many individual positions that it will be placed into during the animating of a scene. The easiest way of thinking about it is simply to imagine your own skeleton, the armature is the puppets skeleton. Unlike a human skeleton that holds a pose with the use of external (to the skeleton) muscles attached to the bones, in a stop motion puppet the joints and hinges in the design must be solid, and tight enough to lock themselves into a position and hold it, with the weight of the puppet for an indefinite amount of time.
There are two types of armature typically used in stop motion.
ALUMINIUM WIRE:
Generally constructed from 2 or more strands of wire, twisted together, this is the cheapest of the two armature options. They can vary in their design so that you could build one from the cheapest of materials, or take it to the fullest and combine the wire with machined metal and adjustable pieces which allow head and limbs to be swapped in and out should any break during production.
OR
BALL AND SOCKET JOINTS:
Constructed from individually machined ball and socket joints, this armatures are the créme de la créme of stop motion.
Specifically manufactured for each puppet design they can be incredibly expensive, unless you have the metal work skills to build them yourself.
However, the smoothness in the joints and ability to adjust the tightness of every joint leads to a much more precise control over your puppet, and are far, far, far more durable than the wire puppets.
So! How does this all tie in to 'The Haunts', well straight off the bat I cannot afford ball and socket armatures for this project, so there's one decision made right there! In future projects I plan to build them myself but for this I don't have the time or the tools and I think they might be over kill for what I need.
My puppets will be made from a combination of plasticine and foam build up. All the character heads and hands will be made from plasticine, using replacements (I'll explain the process of replacements in a later post) for the facial animation, and the rest of the puppet will be blocked out with various densities of foam and clothed in hand made, specially tailored costumes. This approach allows me to produce subtleties in facial animation whilst keep the body of the puppet controllable and simple, with very little that can move without my say so (one of the draw backs of using plasticine is that it can deteriate quickly, get dirty and mush into undesired shapes incredibly easily, but this can wait for a later post too).
Take a look at my plans for the 'Clara' puppet:
On the left is a composite image of my entire plans for the puppet made up of several layers of work including wire armatures, rigging, foam padding, hardened control points and various other bits. You can see on the right the various layers of tracing paper that I used to work up the plans.
Being the first time I've built a puppet on this kind of quality scale, I needed a simple way of mapping out my thoughts so that I could see them all together and judge whether they will work. I'm pretty confident in the plans for this puppet and I can't wait to start fabricating her.
One of the key features of the design here is the lack of any leg armature... This is because she has a long flowing dress which would make animating her legs underneath it impossible. My solution is to build a stand on which she will sit at her neutral and natural height, then I will use a rig to raise her up and down to simulate the bob of her walking. I think I can get away with this approach because she is a slow moving, graceful character and just the suggestion of her walking should be enough to sell it.
Well, I think I'll leave it there for today. I have so much more to say but we'll leave it for episode two! :)
Come back in the next few days to see how progress goes on building this beauty.
Meet Sebastian! Before I talk about what I want to talk about with this post, I just wanted to show off the new maquette of our second lead character, Sebastian, a cranky old git with a mischievous streak. Looking at this maquette we can clearly see exactly why we need these things in the first place.
Having had a couple of days to study this sculpt, we can now look at it with a more objective eye and suggest changes that will go into the final puppet. See if you agree with my thoughts:
1. Immediately the width of the neck is too thin, needs to be slightly bulkier to believably carry the weight of his head.
2. His monocle is slightly too small, forcing his eyebrow down too far in an attempt to hold it. Increasing the size of the monocle will allow his brow to sit very slightly higher and more relaxed.
3. He could do with very slightly more of a top lip. The front of his face is a little flat above the lip.
Hopefully this has wrapped up the issue of maquettes quite nicely. If anyone has any questions about my approach here, feel free to question away. Or if you have any tips for me, that would be appreciated too!
Now, to the bulk of the poooosst!
The Story is All!
So, who wants to know what it's all about? Eh? OK... Here comes an attempt to tell you all about the story of 'The Haunts' without giving anything away.
Here goes:-
In the attic of a victorian mansion, an eccentric old ghost shows his brokenhearted companion what fun is to be had in the afterlife, when a new family moves in.
Hmmm.... vaguely specific enough for you? It better be.
'The Haunts' is a short, 2 page script that I wrote one rainy afternoon, about a year ago; for some reason it's stuck with me and I'm so chuffed I'm finally going to make it. It's (hopefully) a sweet, funny little tale that everyone can enjoy.
As you all probably know already, in film, the story is king. I want to talk about this idea briefly... I have a background in live action filmmaking and in that sphere of the movie world I (or the community at large) would probably adapt that phrase to "the script is king". In live action you write a script, and it becomes the written blueprint for your movie; a place for everyone in the creative team to merge there ideas together, and a springboard for further creative output. However, in my limited experience, the script can become a crutch, rather than a blueprint.
Ideas and images get pushed aside because they're not in the script. The script literally becomes the king!
One of the things that working by myself and in animation allows me to do, is forget the script. If i think of an idea that I like I can immediately shift the elements in my head to allow for it. It's a wonderfully thrilling experience. I adore working with a crew, on a set, on a film but as so many eyes take in the written words of the script and internalise that direction, everyone becomes more reliant of the document to tell them what's going on around them. This time around, that problem doesn't exist.
In animation however, the standard practise has nearly always been a little different. Animation is/has been a medium swamped in the visual realm. It can literally do anything. Therefore you are free to think outside the box a little more perhaps, and has been generally, created by story men and artists (in a drawing sense) rather than writers. Since the very start of animation with Disney and the like there has been a different monarch reigning over animation story preproduction...
The Board is King!
Since the first animation directors/writers were the animators themselves, it was easier for them, in discussion, to simply draw the ideas that they had in a sequence of quick sketches rather than type out a script. Drawing the sequences in this way keeps your head in a truly visual space, thinking of timing and blocking from the off, setting out at the beginning the very frames of what will end up in the finished product. Not only would these pioneers draw the frames or shots of the film but also the characters movements within them.
These images are then put in sequence and are called the STORY BOARD.
In live action storyboards (especially lo-budget productions) what you have is little more than a visual shot list. One image per shot that sets out the framing of the camera on the scene. In animation story boards though, one shot could have infinite images blocking the characters key movements through the scene. Imagine, if it helps, a graphic novel. Story boards should convey everything that is needed in the final piece i.e. blocking, camera movement, emotional changes within the acting. Everything begins in the storyboards.
My storyboard process on this film is quick and dirty. Barely more than notes scribbled 10 images to an A4 page, but it helps tremendously in setting down my ideas so I don't have to expel energy holding on to them, I can concentrate on the practicality of carrying them out. Other people would probably not see much information in my boards, however to me they are like keys that when viewed unlock the rest of the image within my head.
Normally I wouldn't be this rushed with the boarding process, in fact normally storyboarding takes just as much time if not more than writing a script. But I've been living with this idea for a year now, I know where I am with it.
However I do regret that I won't have time to create an animatic. Many of you reading this no doubt will already know what an animatic is. Probably most of you will have made one for your work but for those, like my girlfriend, who are telling me that they're actually learning stuff from this blog, an animatic is another technique pioneered in the disney studio (DISCLAIMER: this fact may not be a true fact, please correct me in the comments. ;) ) and is an extrapolation of the storyboard.
Basically the animatic is a moving storyboard. If I were creating one for 'The Haunts' I would take my still images that I created in the storyboard, scan them into a computer and into a video editing program and I would cut them together in such a way that I could get an approximate feeling of pace for the final film. In essence I would be creating a very crude animated movie where a character moved through the shot in a jerky fashion to illustrate to the viewer the speed at which they moved through the shot, and when and how that shot then cut to the next and so on.
To take it all the way, we could then add in temporary music and dialogue audio and get a pretty close approximation of what we would end up with in the finish movie.
If you made sense of that, well done. I'm not sure I explained it effectively so heres an extract of the animatic for Toy Story before Pixar decided to change their entire approach to the story. This is a pretty strange watch for any Toy Story fans.
Animatic starts at 0:35 secs.
And that's all I've got for you today. I hope you enjoyed yourself.
Thanks for looking, and let me know you're there by getting in touch.
Right! Here's some news. The Virgin Media Shorts competition has swung around once more and I've decided to attempt to make this film, in time for the deadline for the competition. The reasons being, I could win £30,000 which would get my next short (some of you may already be aware of it, if not, feel free to ask) off the ground and having a deadline such as this one, July 18th, will help me keep 'The Haunts' chugging along at a pace.
So now theres a whole heap more riding on this film, let's get to work!
Maquettes!
The last couple of days have been spent working out my character designs in 3-D. Taking the original paper sketches and transforming them, sculpting it into a 3-dimensional space. This process brings with it a heap of challenges and minute changes that must take place in order to iron out the attributes which work on paper but for one reason or another, simply cannot work in a puppet.
Take a look below at this finished maquette of our lead 'Clara'.
She's made from several colours (mixed to choice from other colours) of Newplast plasticine, which is the medium that I will be using for her face in the final puppet. Working with the clay, especially having one colour butt up against another, presents a heap of headaches; not least of which is the fact that one colour easily smudges into the next and involves constant cleaning of hands and scraping back of dirty clay.
In the final puppet, only the face will be made of clay. The hair will be fibrous or at the least, a hard cast skull cap type job and clothes will be made of material and tailored to the puppets form.
For an example of the kind of patience and skill it takes to pull off a puppet made and animated entirely in clay, look no further than the brilliant team over at Mr. Plastimime!, they're running a kickstarter to get Daniel Greave's next film off the ground. It's stunning stuff so take a look, they would really appreciate your support.
So, let me take you through my process and show you how the 'Clara' maquette came together:
1. Gather your necessaries. Before I start, I collect my sculpting tools, my clay, glass beads (for eyes) and I bring my character design sketches to the table. Every decision I make from this point on is based upon checking against the original sketches, trying to bring in the graphic elements that I love into the 3-dimensional space. I then make a small wire loop and attach it to stiff cardboard to give me a simple armature on which to sculpt.
2. I start by pressing together a ball of clay upon the armature and shaping it into a basic shape. I then press two eyeballs into it, checking back against the sketches to estimate the final distance between the eyes.
3. Next, I take on the details, adding clay and smoothing clay as I go around. While I'm adding material I'm looking closely from a frontal and a profile view of the sculpt to make sure I'm hitting the right "graphic" lines that go into the characters design. At this stage I'm working very fast, moving on instict and trying to bring all of the sculpt along at the same pace to get a real sense of "the whole".
4. Now is the time to block in the mass of the body and give more of a balance to the whole sculpt. At this stage I've also sculpted a hair cap of clay into the head, making sure to mould it into the correct hairline along the skull.
5. 'Clara' has a lot of hair. A lot! But it's integral to the balance of her design. However it poses a slight problem for our sculpt in that, the amount of clay it would take to fill out her hair would be too heavy to hold up it's own weight. My solution to this was to build a small under structure for the hair from tissue and electrical tape adhered to another wire loop. The armature is then pushed into the back and the head and covered with a thin layer of clay, reducing the weight by about 3/4s.
6. And we're almost there! The final stages see the little details attached. Sculpting some fringe to her hair and adding straggling hair beside her ears helps to sit the hair onto the head and balance out her face. I also added the hair band an a couple of buttons just to finish her off. The last thing to take care of is to smooth her out. This process is the most labour intensive and laborious of the whole thing. It involves pressing, patting and rolling the clay with your finger tips to weed out the imperfections and a quick application of oil that reacts to the clay in much the same way that alcohol does with super sculpey.
And she's done! That's all there is to it.
Take another look at the top image to see her in all her smoothened glory :)
If you reached the end here, thank you! I hope this was all interesting for you. Feel free to spread the word about the film, and get involved... I would love to here from you all.
So, currently I'm figuring out the look of my protagonists. This is a fairly fluid process as I have the power to follow my whim and change my ideas from the ground up (script up) as I go along. While I have a finished script, there are many character types that would fit into the role, and the joy of creating characters is that I get to try on a lot of different peeps before setting my decisions in stone.
I'm fairly close to having a final cast I think, but I'll save them for a future post. What I want to talk about today is my approach to character design. To let you know, I'm coming at this with no school education in these arts whatsoever! So don't take what I say as gospel, this is just what works for me.
Let's go!
So I kick off throwing around some facial profiles, working with shapes, and an idea of what I think the character ought to look like and just as importantly, who the character actually is... Is he obnoxious, soft hearted, weak, strong, arragant, posh, working class - All these things play apart. While they may seem a little simplistic and clichéd, asking these kind of question helps me narrow in on the character that I'm trying to create.
At this stage, there is very little consideration to how the finished puppet will actually be animated.
Eventually after many small sketches I'll hit upon a profile design that I like and from there, I'll attempt to work out the features from other planes, i.e. front, 3/4's profile and so on. With this I'm looking to pull the design features from the original profile and try and realise how to keep the integrity of their design and the balance of the features as the head turns around. At this stage the drawings are quite still and lifeless as I'm concentrating on the default structure of the head before I figure out how the face actually moves and shows expression.
But a face alone, does not a character make! Next we take on the body shape, the stature and overall construction of the character. Working in tiny thumbnails (these are approx real size), I dabble with ideas of how I think the character stands, how she/he carries themselves, the distribution of weight across their body.
Working quickly, with no reverence for the drawings, I springboard from one idea to the next, informed and armed as I go along with the knowledge of what worked from the last pose and what still wasn't right. I eventually wheedle out the imperfections until I reach the final pose.
And I've hit upon something that I think may work, I set about drawing the character, usually in a 3/4's profile as it helps to bring some interest into the drawing, and helps in the understanding of how their weight moves across their bodies.
For me, designing characters is a little bit of a lottery. As I'm in control of this whole project, I am able to sight my sights on quite specific outcomes from the start, so there's not as much extrapolation and different design ideas that come to the fore as there would be in a studio project or a larger collaboration.
However, everything you've seen here has been rejected so perhaps that's all nonsense. :)

 So I took another pushed casting of my last Clara mould and took to fixing it up, polishing and adjusting here and there, as this will become my actual puppet, I took my time and took the work a little more seriously. For ease of moulding I removed the ears and extraneous details such as eyelids (which will be added as separate pieces, making them easily animatable).


 Getting excited, I quickly through together a mould box around the face piece and poured in plaster, straight over the sculpt to create a one piece mould.